
Maintaining the brightness and aesthetic appeal of your outdoor lighting fixtures is crucial for enhancing the beauty of your home and for safety and security reasons.
Over time, outdoor light fixtures can accumulate dirt debris and become a habitat for bugs, diminishing their functionality and attractiveness. This comprehensive guide will walk you through the steps to clean your outdoor light fixtures effectively, ensuring they remain in top condition year-round.
How Often Should Outdoor Light Fixtures Be Cleaned?
Determining the frequency of cleaning outdoor light fixtures is essential for maintaining their functionality and enhancing the curb appeal of your property. Unlike indoor fixtures, outdoor lights are exposed to the elements, including dust, rain, snow, and even salt, in coastal areas, all of which can accelerate wear and decrease performance over time.
As a general guideline, outdoor light fixtures should be cleaned at least twice a year. However, the specific cleaning schedule can vary based on several factors:
Location and Climate: Fixtures in areas with high pollution levels or harsh weather conditions may require more frequent cleaning. For instance, homes near the ocean may need to clean their fixtures more often due to salt air causing quicker accumulation of grime and potential corrosion.
Type of Fixtures: Some light fixtures are designed with more intricate details and crevices, making them more susceptible to collecting debris and insect nests. These types need closer attention and more frequent cleaning.
Landscape and Surroundings: Outdoor lights in areas with many trees, bushes, or high pollen can accumulate dirt faster than in clear, open spaces. If your lights are under or near foliage, consider inspecting them seasonally to determine if additional cleaning is necessary.
Usage: The frequency of use can also influence how often cleaning is needed. Lights used more frequently may attract more insects and need to be cleaned more regularly.
Seasonal Cleaning Tips
Spring: A thorough cleaning in spring can address any buildup from winter weather, such as salt or water spots, ensuring your fixtures are ready for the brighter days ahead.
Fall: Preparing your fixtures for winter by cleaning them in the fall can help prevent damage from cold weather conditions. It’s also an ideal time to check for necessary repairs before harsh weather sets in.
How Do You Safely Remove Dust and Cobwebs from Outdoor Lights?

Safely removing dust and cobwebs from outdoor light fixtures is a straightforward task that can significantly improve their appearance and functionality. Here’s a simple method to ensure you do it safely and effectively:
- Turn Off the Power: Always start by turning off the power to the fixtures at the circuit breaker to eliminate any risk of electric shock. This safety step is crucial, especially if you’ll be hardwired cleaning fixtures.
- Use a Soft Brush or Duster: For lightly soiled fixtures, a soft brush or a microfiber duster can gently remove dust, cobwebs, and loose debris. A brush with a long handle is handy for reaching high fixtures without needing a ladder.
- Employ a Vacuum with a Brush Attachment: For a more thorough clean, especially in crevices where dust and cobwebs accumulate, use a vacuum cleaner equipped with a soft brush attachment. This method effectively removes debris without scratching the surface of the fixtures.
- Wipe with a Damp Cloth: After dusting, lightly dampen a soft cloth with water (and mild soap if necessary) to wipe down the exterior of the fixtures. This will remove any remaining dust and give the fixtures a clean finish. Ensure the cloth is dry enough to avoid water seeping into the fixture.
- Dry Thoroughly: Use a dry, soft cloth to dry the fixture thoroughly after cleaning. This step prevents water marks and ensures that no moisture is left behind, which could damage the fixture or affect its operation.
- Regular Maintenance: Removing dust and cobwebs from your outdoor light fixtures maintains their beauty and prolongs their lifespan. Incorporating this task into your seasonal maintenance routine ensures your lights remain in optimal condition.
Following these steps, you can safely and effectively remove dust and cobwebs from outdoor light fixtures, enhancing your outdoor spaces’ illumination and aesthetic appeal.
What Precautions Should You Take When Cleaning Wired Outdoor Light Fixtures?
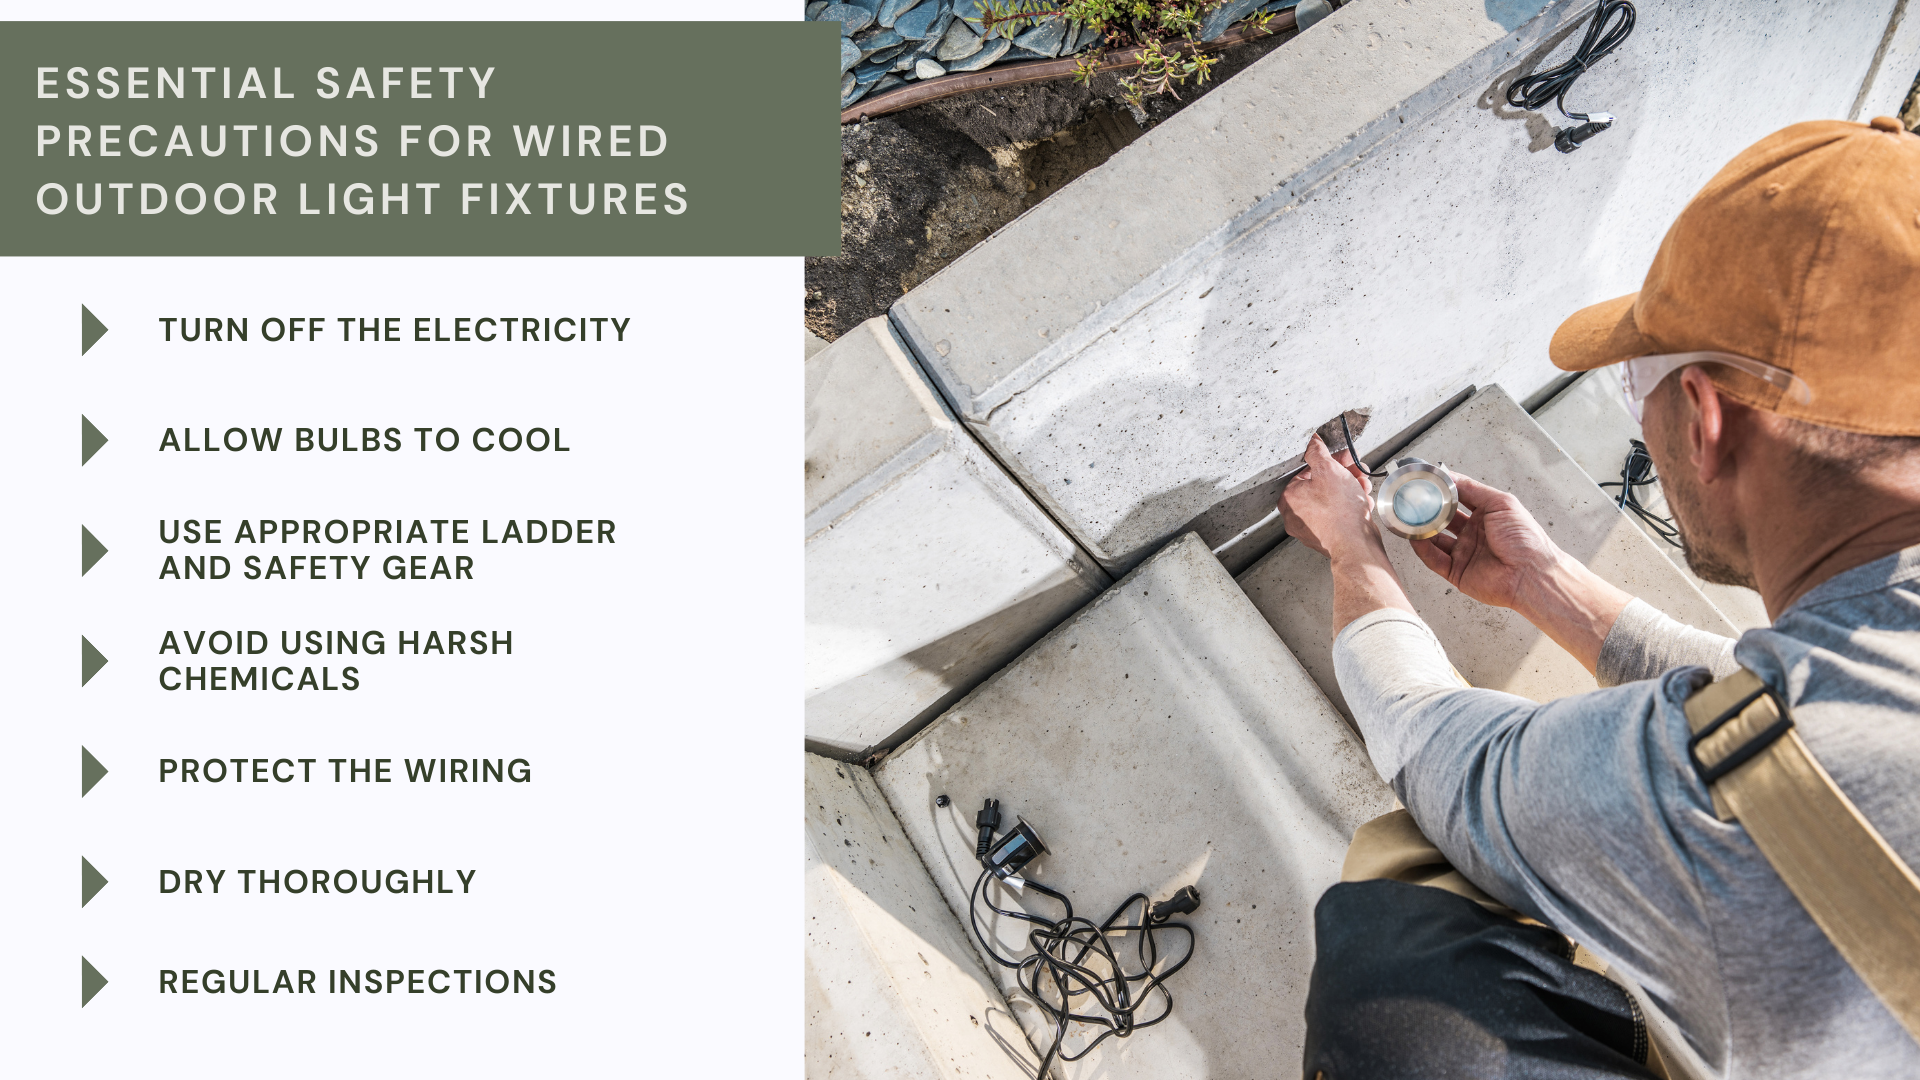
When cleaning wired outdoor light fixtures, safety should be your top priority to prevent electric shock, damage to the fixture, or personal injury. Here are essential precautions to ensure a safe cleaning process:
- Turn Off the Electricity: Before cleaning, ensure the electricity to the outdoor light fixtures is turned off at the primary power source or circuit breaker. This eliminates the risk of electric shock.
- Allow Bulbs to Cool: If the lights were recently on, wait until they have cooled down before cleaning them. Handling hot bulbs can result in burns or accidental breakage.
- Use Appropriate Ladder and Safety Gear: If the fixtures are out of reach, use a stable ladder to access them safely. Ensure the ladder is on a firm, level surface, and consider wearing non-slip shoes to prevent falls. Safety gloves can also protect your hands from sharp edges on the fixtures.
- Avoid Using Harsh Chemicals: Harsh cleaning agents can damage the finish of outdoor light fixtures. Instead, opt for mild, soapy water or cleaners recommended by the manufacturer. Ensure that any cleaning solutions used are suitable for the material of your fixtures to avoid corrosion or discoloration.
- Protect the Wiring: Be cautious not to disturb the wiring within the fixture. Avoid spraying water or cleaner directly into the fixture to prevent water from contacting electrical components. A gentle wipe with a damp cloth is often sufficient for cleaning.
- Dry Thoroughly: After cleaning, ensure the fixture is completely dry before turning the electricity back on. Water and electricity are dangerous, so avoiding moisture in or around the fixture is crucial once power is restored.
- Regular Inspections: While cleaning, inspect the fixtures for any signs of wear or damage, such as frayed wires or cracks. Addressing these issues promptly can prevent future hazards.
By following these precautions, you can safely clean your wired outdoor light fixtures, maintaining their functionality and appearance while ensuring your safety and the longevity of the fixtures.
What Solutions Are Effective for Cleaning Glass Panels in Outdoor Lights?
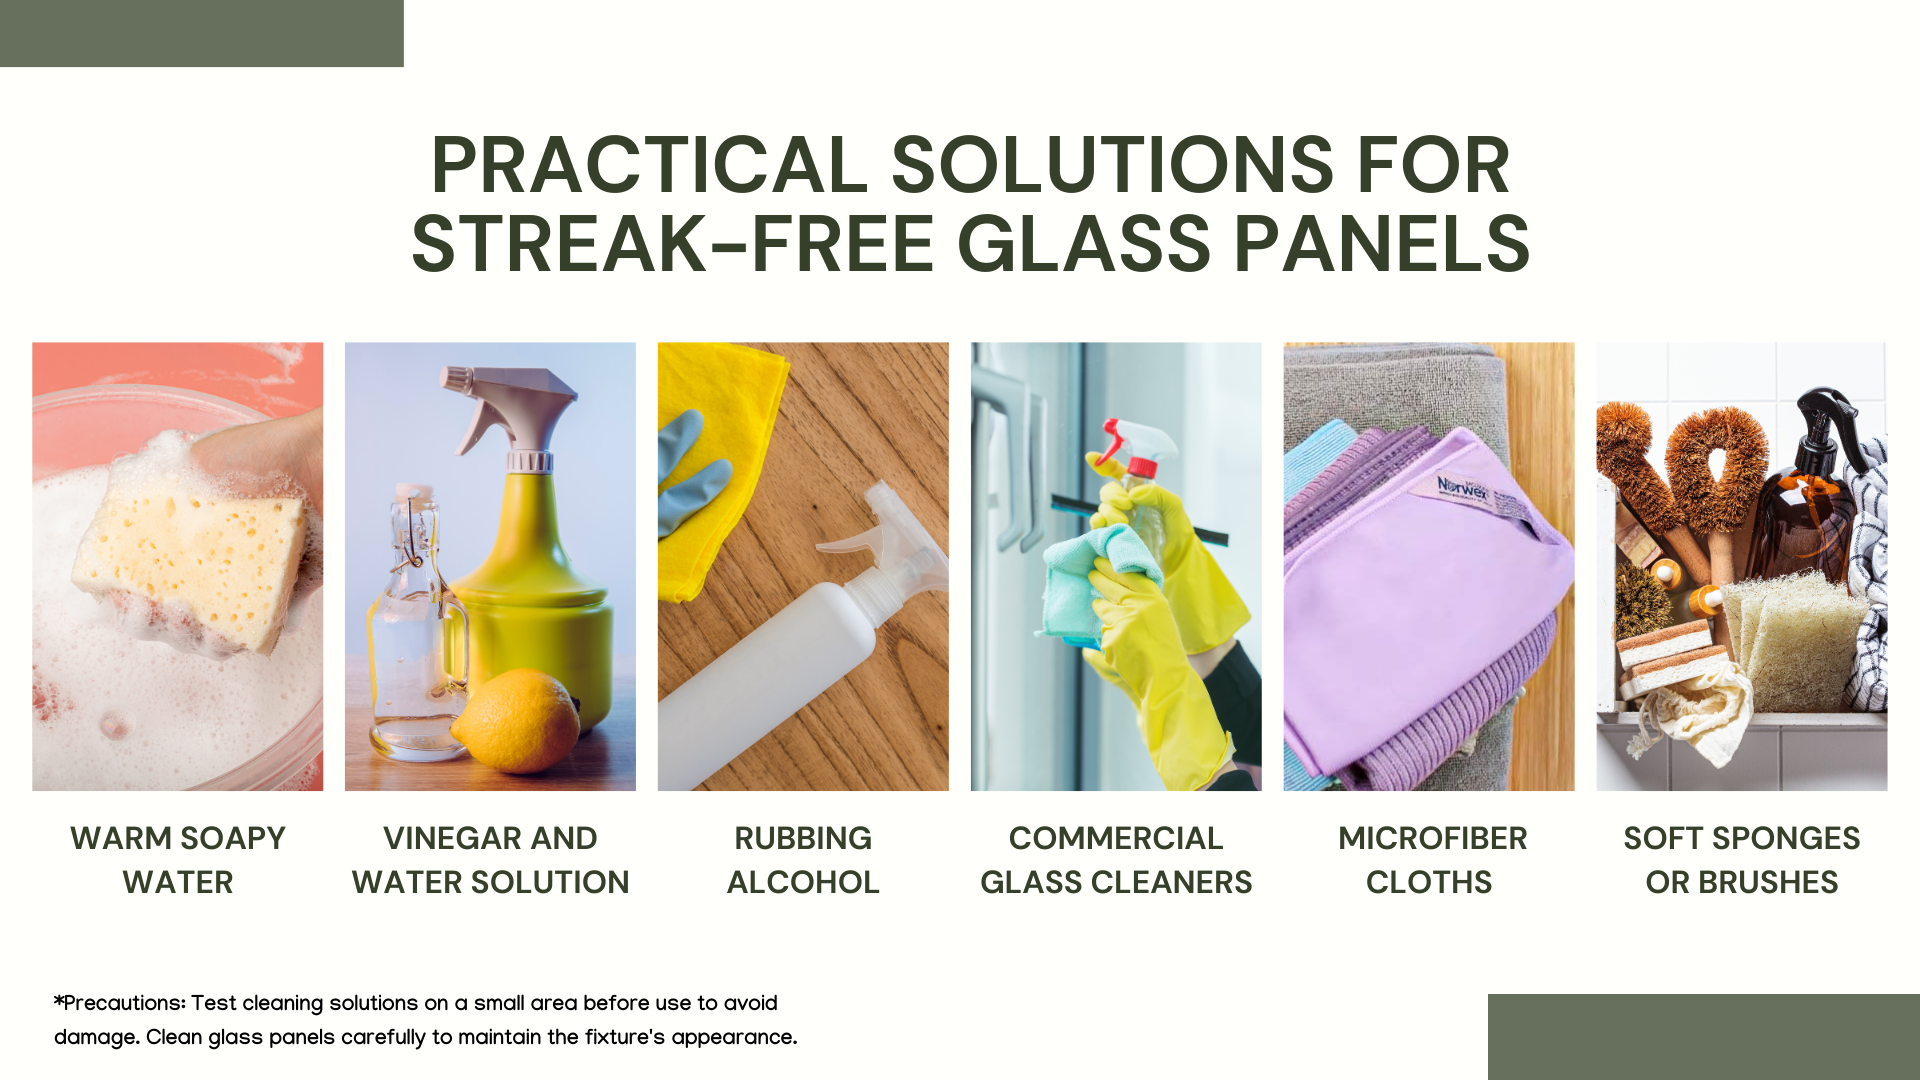
Cleaning glass panels in outdoor lights is essential for maintaining clarity and maximizing light output. Here are some practical solutions for achieving streak-free and clear glass panels:
- Warm Soapy Water: Mixing mild dish soap with warm water is a simple yet effective cleaning solution. This gentle solution effectively removes grime, dust, and fingerprints from glass panels without causing damage.
- Vinegar and Water Solution: Mix equal parts of white vinegar and water for a more natural cleaning solution. Vinegar is excellent for cutting through tough water spots and mineral deposits from rainwater, leaving the glass sparkling clean.
- Rubbing Alcohol: For stubborn stains or grease, rubbing alcohol can be diluted in water or applied directly to a cloth. It evaporates quickly, reducing streaks and leaving the glass panels clear.
- Commercial Glass Cleaners: Many commercial glass cleaning products are formulated specifically for cleaning glass surfaces. These can be very effective in providing a streak-free finish but should be used according to the manufacturer’s instructions to avoid any potential damage to the glass or surrounding materials.
- Microfiber Cloths: Regardless of the cleaning solution used, wiping the glass panels with a microfiber cloth is advisable. Unlike paper towels or regular rags, Microfiber cloths are gentle on glass and do not leave lint or streaks behind.
- Soft Sponges or Brushes: When dealing with more textured glass or intricate designs, a soft sponge or brush can help reach crevices without scratching the glass surface. Always use gentle pressure to avoid damage.
Precautions: When using any cleaning solution, especially homemade mixtures or chemicals like rubbing alcohol, it’s essential to test a small, inconspicuous area first to ensure it does not damage the glass or the finish of the light fixture. Also, ensure that the cleaning solution does not come into contact with non-glass parts of the fixture to avoid corrosion or damage.
Using these solutions and tools, you can effectively clean the glass panels in your outdoor lights, ensuring they remain bright and visually appealing.
What Are the Advantages of Using Norwex Cloths for Outdoor Lighting?

Norwex cloths are designed with microfiber technology, offering several advantages for cleaning outdoor lighting fixtures. Their unique features make them an ideal choice for maintaining the appearance and functionality of these fixtures. Here are some key benefits:
- Superior Cleaning Ability: Norwex microfiber cloths have a high density of fibres, making them more effective at trapping dirt, dust, and grime. This allows for thorough cleaning of outdoor light fixtures, removing debris that can accumulate and diminish lighting quality.
- Chemical-Free Cleaning: One of the main advantages of Norwex cloths is their ability to clean effectively without harsh chemicals. This is particularly beneficial for outdoor lighting, as it reduces the risk of damaging the fixtures’ finish or harming surrounding plants and wildlife.
- Environmentally Friendly: Norwex cloths offer an eco-friendly cleaning solution by eliminating the need for chemical cleaners. Additionally, their durability and reusability mean less waste than disposable cleaning products.
- Water-Only Cleaning: Norwex microfiber cloths are designed to be used with water alone, simplifying the cleaning process and avoiding streaks on glass panels and polished surfaces. This is especially useful for maintaining the clarity and shine of outdoor light fixtures.
- Lint-Free Finish: Unlike traditional cloths or paper towels, Norwex cloths leave no lint or streaks behind. This ensures that glass components of outdoor lighting remain clear and free from residues that can affect lighting efficiency.
What Are the Recommended Materials for Cleaning Outdoor Lights?

Using suitable materials is crucial for effectively and safely cleaning outdoor light fixtures. These materials ensure that the cleaning process is thorough and help preserve the fixtures’ integrity and appearance. Here are some recommended materials for cleaning outdoor lights:
- Microfiber Cloths: For wet and dry cleaning, microfiber cloths attract and hold dust, dirt, and grime without scratching surfaces. They are handy for polishing glass components without leaving streaks.
- Soft Brushes: A soft-bristled brush can gently remove debris and cobwebs from intricate designs and hard-to-reach areas without damaging the fixture.
- Mild Soap: A mild, non-abrasive soap mixed with water creates a gentle cleaning solution safe for most outdoor light fixtures, including metal, glass, or plastic.
- Bucket of Warm Water: With mild soap, warm water helps dissolve and remove dirt more effectively. Always ensure the water is not too hot to prevent thermal shock to glass parts.
- White Vinegar: For eco-friendly cleaning, especially to remove water spots and mineral deposits from glass, a solution of equal parts white vinegar and water can be very effective.
Are There Any Eco-Friendly Cleaning Products for Outdoor Lighting?
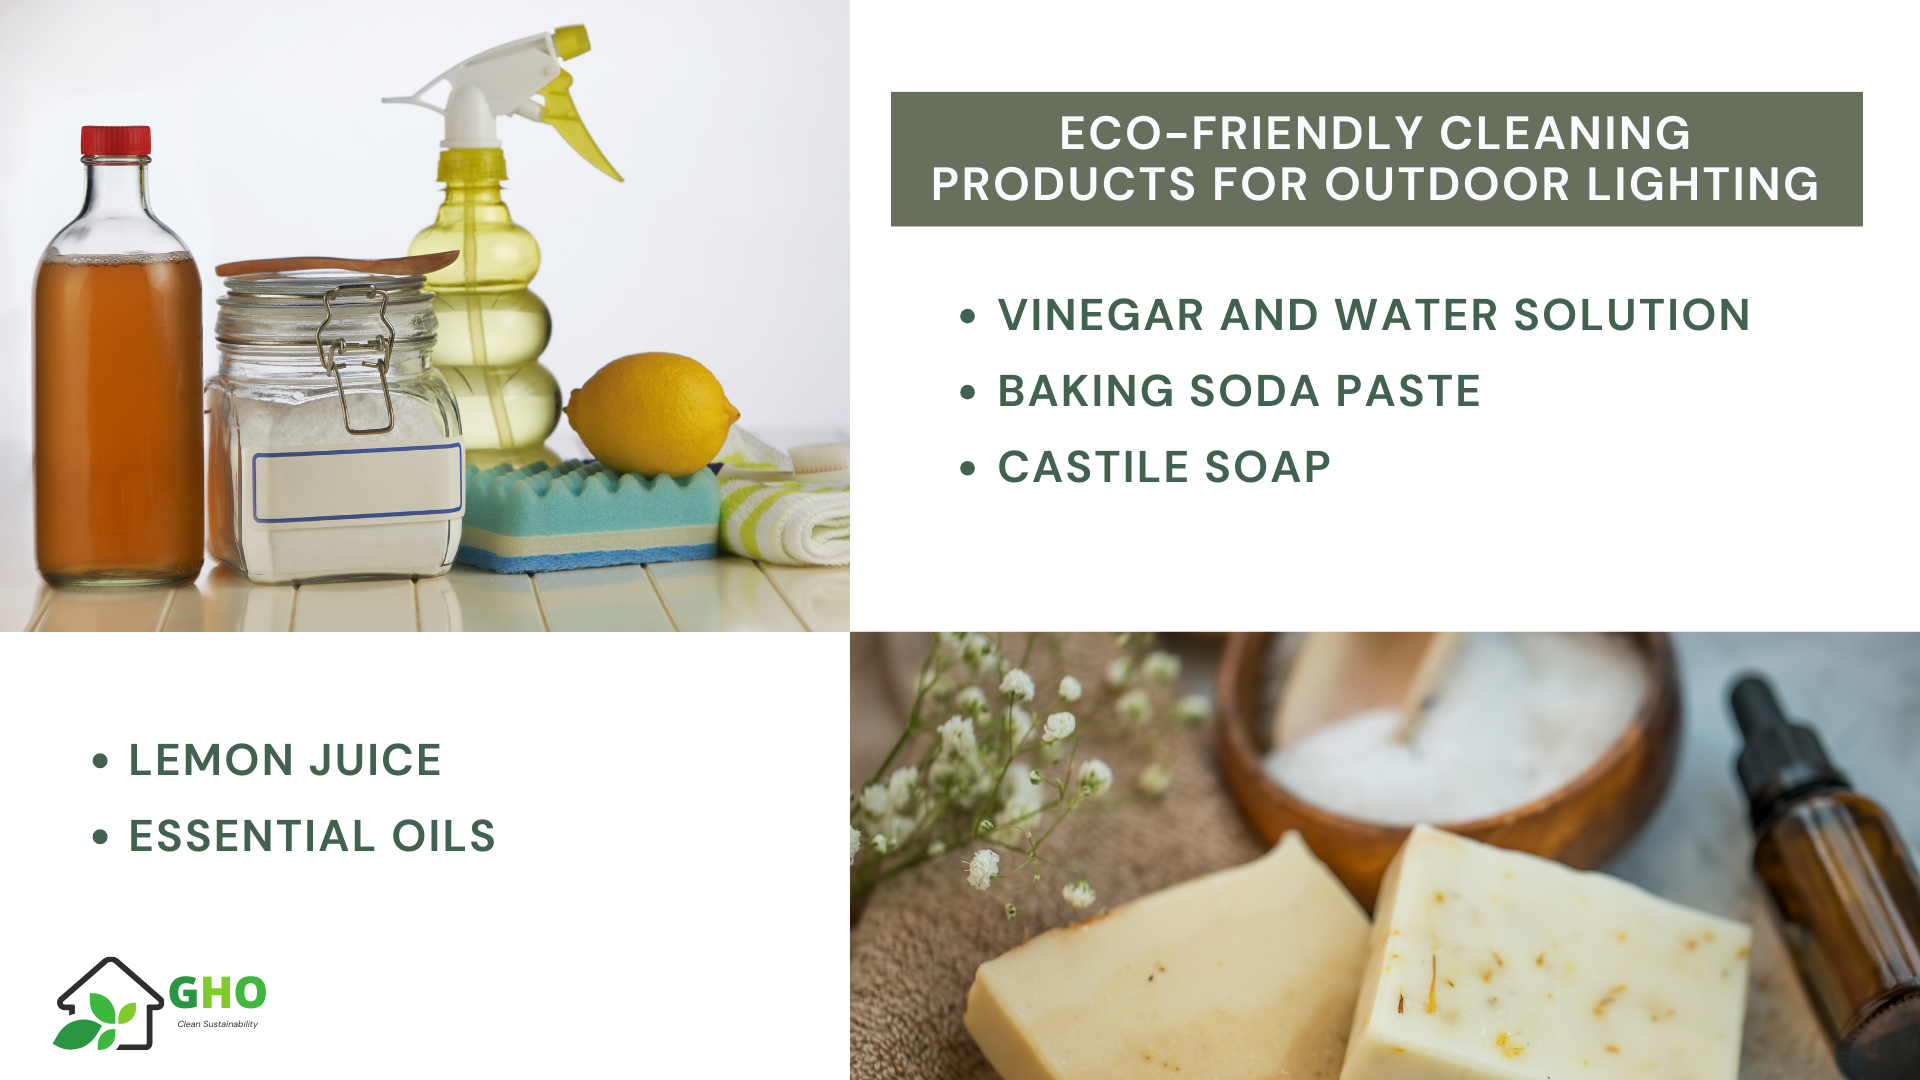
Yes, several eco-friendly cleaning products and solutions are effective for cleaning outdoor lighting fixtures while minimizing environmental impact. These products are designed to be safe for the environment, often made from natural ingredients that are biodegradable and non-toxic. Here are some eco-friendly options for maintaining outdoor lights:
- Vinegar and Water Solution: A mixture of equal parts white vinegar and water is an excellent natural cleaner for glass parts of outdoor lights. Vinegar effectively cuts through grime and mineral deposits without harming the environment.
- Baking Soda Paste: For tougher stains on non-glass parts, a paste made from baking soda and water can be applied, left for a few minutes, and gently scrubbed away. Baking soda is non-toxic and safe for various surfaces.
- Castile Soap: Made from plant oils, Castile soap is a versatile and biodegradable cleaning agent that can be diluted with water to clean metal and plastic surfaces of outdoor lighting fixtures.
- Lemon Juice: Lemon juice, directly applied or mixed with water, can be a natural bleaching agent for removing stains and adding a fresh scent to the cleaning process. It’s particularly effective on glass and can help to dissolve hard water marks.
- Essential Oils: Adding a few drops of essential oils, such as lavender or tea tree oil, to your cleaning solutions can boost cleaning power due to their natural antimicrobial properties. They also leave a pleasant, natural scent.
How do you make homemade cleaning solutions safe for outdoor lights?
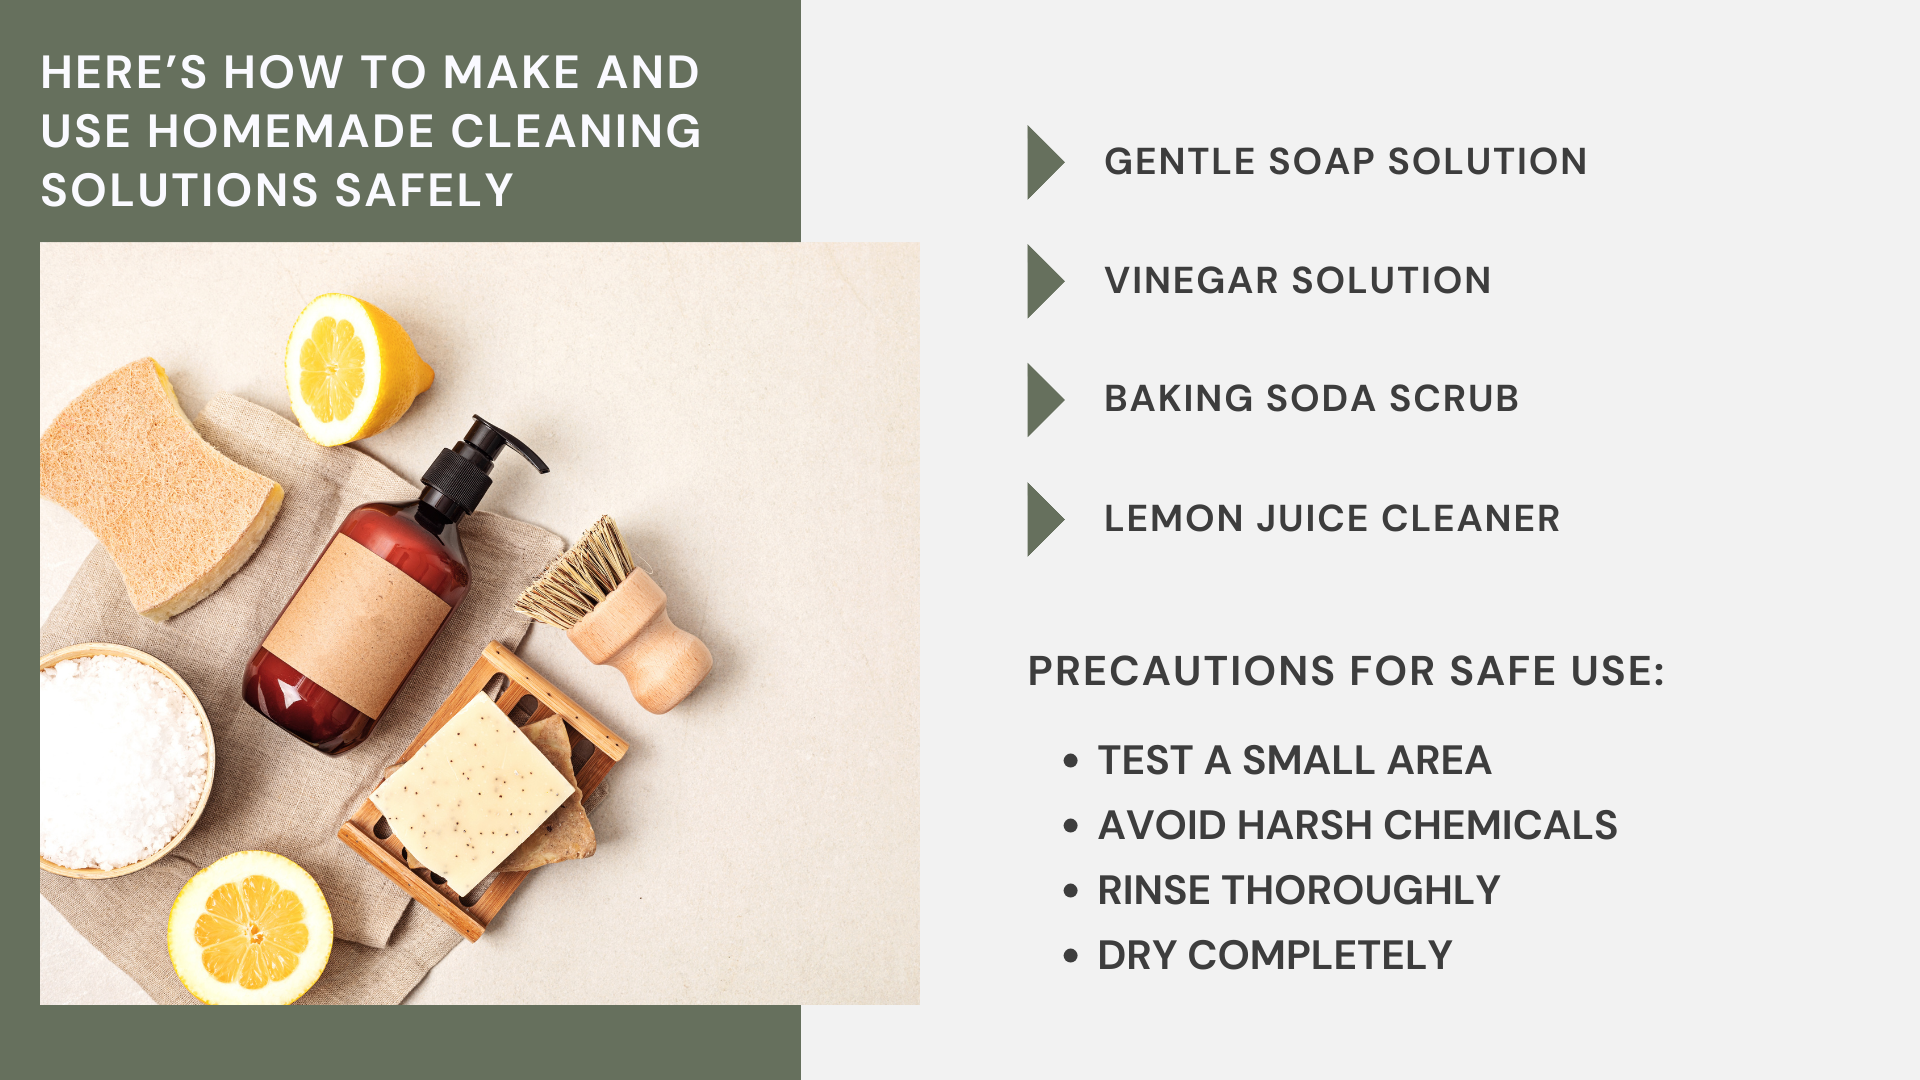
Creating homemade cleaning solutions for outdoor lights is a practical, eco-friendly, and cost-efficient way to maintain lighting fixtures. To ensure these solutions are safe for outdoor lights, it’s vital to use gentle ingredients on various materials, including metals, glass, and plastics. Here’s how to make and use homemade cleaning solutions safely:
- Gentle Soap Solution: Mix a few drops of mild dish soap with warm water. This solution is safe for most outdoor lighting materials and is effective for general cleaning without leaving residue.
- Vinegar Solution: Combine equal parts of white vinegar and water for a cleaning solution that effectively removes water spots and mineral deposits from glass panels. Vinegar is natural and eco-friendly but should be used cautiously on painted or coated metals to avoid potential damage.
- Baking Soda Scrub: For tougher stains on non-glass parts, create a paste with baking soda and a small amount of water. Apply the paste gently with a soft brush or cloth, scrub lightly, and rinse thoroughly. Baking soda is non-abrasive and safe for most surfaces.
- Lemon Juice Cleaner: Lemon juice mixed with water can be a natural bleaching agent, ideal for brightening glass and removing stubborn stains. Its natural acidity helps break down grime and leaves a pleasant scent.
Precautions for Safe Use:
- Test a Small Area: Before applying any homemade solution to your outdoor lights, test it on a small, inconspicuous area to ensure it does not damage the finish or material.
- Avoid Harsh Chemicals: Steer clear of using harsh chemicals or abrasive materials that could scratch or damage the surfaces of your outdoor lights.
- Rinse Thoroughly: After cleaning with any solution, rinse the fixtures thoroughly with clean water to remove any residue that could attract dust or degrade materials over time.
- Dry Completely: Ensure all parts of your light fixtures are completely dry before reassembling and turning the power back on to prevent water damage or electrical hazards.
How Do You Deal with Rust and Corrosion on Outdoor Light Fixtures?
Rust and corrosion are common issues that can affect the longevity and appearance of outdoor light fixtures, especially those exposed to moisture or in coastal areas. Addressing rust and corrosion promptly can help preserve the fixtures and prevent further damage. Here’s how to effectively deal with these issues:
- Identify the Affected Areas: Closely inspect the outdoor light fixtures to identify all areas affected by rust and corrosion. This will help determine the damage’s extent and the appropriate treatment.
- Turn Off the Power: Ensure safety by turning off the power to the fixtures at the circuit breaker before starting any work.
- Clean the Fixture: Use a soft brush or cloth to remove loose rust and debris from the fixture. A wire brush may be needed for more stubborn rust, but use it cautiously to avoid damaging the fixture’s surface.
- Apply Rust Remover: For significant rust, apply a commercial rust remover or converter according to the product instructions. These products are designed to dissolve rust and can prepare the surface for necessary repainting. Always wear gloves and protective eyewear when handling chemicals.
- Sand the Surface: After the rust remover has done its work, lightly sand the affected areas with fine-grit sandpaper to smooth the surface and remove all rust. Wipe the fixture clean to remove any dust or residue.

Start Your Eco-Friendly Cleaning Journey Today!
Embrace a healthier, more sustainable way of maintaining your home and office with our range of eco-friendly cleaning solutions. At Green Home and Office, we believe in the power of green cleaning to protect our planet and create safer, toxin-free environments for you and your loved ones.


